
Our Process
The Laptop Donation & Refurbishment Workflow
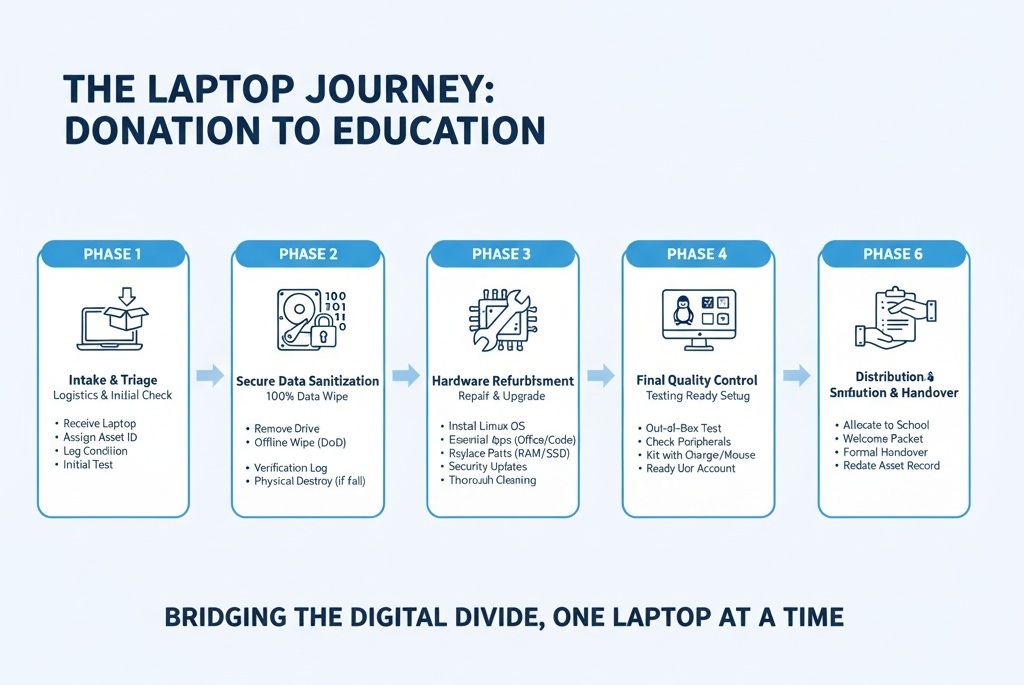
This process is broken down into six distinct phases, each with critical steps to ensure security, quality, and impact.
Phase 1: Intake & Triage
This phase begins the moment the donation is received. The goal is to log the device and determine its viability.
Receive Donation: The laptop (and any accessories like chargers) is received from the donor.
Assign Asset Tag: An internal, unique ID (e.g., a “Timbuktu Asset Tag”) is immediately affixed to the laptop. This ID is logged in a tracking system (like a simple spreadsheet or a database).
Log Donated Items: The asset tag record includes:
Donor’s name/organization (if provided).
Date of receipt.
Make, model, and general condition.
Any included accessories (e.g., “Includes power adapter”).
Initial Triage: A technician performs a 5-minute “power-on” test to categorize the laptop.
Category A (Viable): Powers on, screen is intact, main components (keyboard, trackpad) seem functional. This device moves to Phase 2.
Category B (Parts Only): Fails to power on, has a shattered screen, or is too damaged for cost-effective repair. Its useful parts (RAM, hard drive, keyboard) will be harvested later.
Category C (E-Waste): Unusable or too old to be effective. This device is flagged for secure, environmentally-friendly recycling.
Phase 2: Secure Data Sanitization (The “Wipe”)
This is the most critical phase for donor security. The goal is the 100% irreversible destruction of all data on the device.
Physical Drive Removal: A technician physically removes the hard drive (HDD) or solid-state drive (SSD) from the laptop chassis. This is a critical security step.
Connect to Wipe Station: The drive is connected to a dedicated, offline “Wipe Station” computer. This computer is “air-gapped,” meaning it never connects to the internet or the internal network.
Execute Data Sanitization:
For HDDs (Spinning Drives): The drive is subjected to a multi-pass data-overwrite procedure using specialized software (like
DBANor a professional equivalent). The industry-standardDoD 5220.22-M(3-pass or 7-pass) method is used, which overwrites every single sector of the drive with 0s, 1s, and then random characters, making data recovery impossible.For SSDs (Solid-State Drives): Overwriting is not effective on SSDs. Instead, a command-line utility (like
ATA Secure Erase) is used. This is a command built into the drive’s firmware that triggers the drive to electronically “flush” all its data cells, resetting it to a factory-new state.
Verification & Certification: The sanitization software generates a “Certificate of Sanitization” (a log file) that confirms the wipe was 100% successful and lists the drive’s serial number. This log is attached to the laptop’s asset record.
Failure Protocol (Physical Destruction): If a drive fails the wipe process, is unreadable, or is non-functional, it is physically destroyed. This is done by drilling multiple holes through the drive’s platters or by using a dedicated drive-crushing machine. The destruction is logged.
Re-install Drive: The now-sterile (or a replacement) drive is re-installed into the laptop.
Phase 3: Hardware Refurbishment & Repair
Now that the device is secure, the goal is to make it fully functional and reliable.
Full Diagnostic Test: The technician boots the empty laptop (using a diagnostic tool on a USB drive) and runs tests on all components:
RAM (e.g., using
MemTest86)Keyboard and trackpad
All ports (USB, HDMI, etc.)
Wi-Fi and Bluetooth cards
Battery health
Repair & Replace: Any failed or weak components are replaced. (This is where “Category B” parts-only laptops are used).
Targeted Upgrades (The “Student-Ready” Boost):
Storage: If the laptop has a slow HDD, it is strongly preferred to replace it with a new, fast SSD. This is the single most important upgrade for a good user experience.
RAM: If the laptop has less than 4GB of RAM, it is upgraded to 4GB or 8GB, which is essential for modern web browsing and office software.
Physical Cleaning: The laptop is thoroughly cleaned. Compressed air is used to clear dust from the keyboard and fans. The screen and chassis are wiped down and sanitized. The goal is to make the device “like new” for its recipient.
Phase 4: Software Installation (The “Fresh Start”)
The goal is to install a clean, secure, and useful software environment for a student.
Operating System (OS) Installation: A fresh OS is installed from scratch. To ensure speed on older hardware and avoid licensing costs, a lightweight, secure Linux distribution is the top choice.
Recommended OS:
Zorin OS Education,Ubuntu MATE, orLinux Mint. These are free, easy to use (look similar to Windows), and come with robust security.
Core Software Suite: A standard package of free, essential software is installed:
Office Suite:
LibreOffice(fully compatible with Microsoft Word, Excel, PowerPoint).Web Browser:
Firefox(with privacy settings pre-configured).Educational Tools:
GCompris(educational games),Scratch(coding for kids),Kdenlive(video editor).Utilities:
VLC Media Player(for all video files), a PDF reader.
Updates & Security: The OS is fully updated with all the latest security patches. A standard, non-administrator user account (“Student”) is created to prevent accidental system changes.
Phase 5: Final Quality Control (QC) & Staging
The goal is to ensure the laptop is 100% ready for a new user.
The “Out-of-Box” Test: A different technician (or a manager) does a final check. They pretend to be the student.
Does it power on quickly?
Does it connect to a Wi-Fi network?
Do all keys on the keyboard type correctly?
Does
LibreOfficeopen a document?Does the charger work?
Kitting: The laptop is paired with a tested, working power adapter. If possible, a basic wired mouse is included.
Staging: The laptop is given a final “Ready for Distribution” status in the asset tracking system and is placed in inventory.
Phase 6: Distribution & Handover
The final and most rewarding phase.
Allocation: Based on requests from the school network, the laptop is allocated to a specific school or a vetted beneficiary student.
Prepare “Welcome” Packet: A simple, one-page, laminated sheet is included. It explains:
“Welcome to your new laptop!”
“How to power on and connect to Wi-Fi.”
“Your ‘Word’ program is called
LibreOffice Writer.”Basic care instructions (e.g., “Don’t eat or drink near the computer”).
Handover: The device is formally handed over to the school or student.
Finalize Records: The asset tag is marked as “Delivered” in the system, noting the recipient. This completes the chain of custody and allows for tracking the laptop’s impact.

OUR IMPACT
Check out our Impact via which we have already positively impacted hundreds of students.